Cover block and uses of cover block
Introduction:
RCC members like footing, column, Beam and Roof slab must
have clear cover. Clear cover is nothing but a gap between outer edge of
concrete surface and outer edge of Reinforcement. Clear cover is not constant
for all RCC members.
For Roof slab, it must be 20 mm
For Beam, column and footing, it must be 40 mm.
Clear cover must be greater if section area of particular
RCC member is larger and less if section area is small.
If we don’t follow clear cover, Failure at surface of the
concrete may occur. So that, so many cracks
will form.
Some examples of failure of roof slab those not using cover block:
 |
| no cover block causing damage at early stage |
 |
| no cover block causing severe damage |
In order to maintain a gap between outer edge of concrete
surface and edge of Reinforcement, we should place a small block called cover
block.
Below the image of cover block for your reference.
 |
| dimension of cover block |
Cover block is a small block made of plain cement concrete. it
may be vary in size according to types of RCC member( Roof, beam. column. Footing).
It has two straight semi circular hollows at top of the cover
block. One is for main rod and other one for distributor in order to don’t allow them to move from placed position.
How to use cover block?:
Simply place it below the main rod of Rcc members.
Here I have given some images to describe how to place cover
block for various structure.
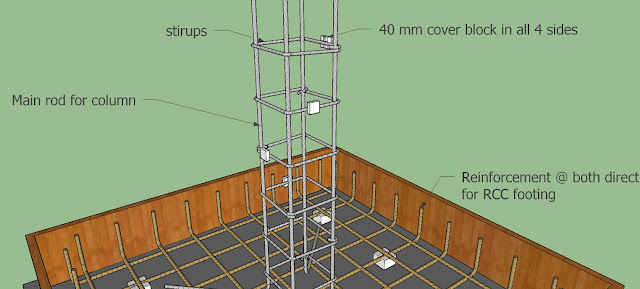
cover block effectively used at RCC footing.
 |
| cover block used for RCC footing |
 |
| cover block used for RCC footing |
In the above image, you can notice some important points.
- Always place cover block of size 40 to 50 mm at bottom of the footing.
- At side of footing leave a space of at least 50 mm to avoid corrosion of steel .Otherwise reinforcement affected by damping earth and corrosion will occur.
- Complete the shuttering work and place the concrete.
cover block effectively used at RCC column.
 |
| cover block for column |
 |
| cover block for column |
In the above image, you can understand some important points.
- Place the cover block at the all 4 sides of the column.Then only you can save the column from failure.
- Place the cover block at the rings and bind it with binding wire.
- After placing the cover block,complete the shuttering work and place concrete.
cover block effectively used at RCC beam and Roof slab:
 |
| front view of cover block at beam and roof |
 |
| perspective view of beam and roof having cover block placed |
From the above two image, some points should be followed.
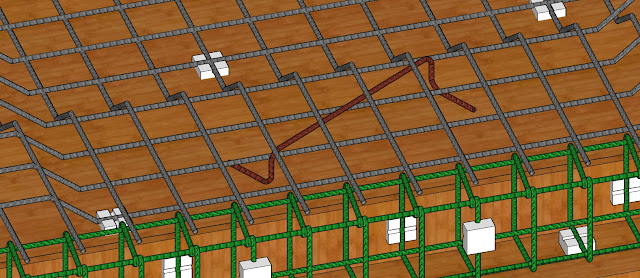
Always place cover block for all 3 sides (bottom, 2 sides)of a beam. leave top side without placing cover block. but place the concrete for extra height as rings plus clear cover.
Place the cover block for roof slab bottom randomly as sufficient as possible.
To protect the top reinforcement at nearer to support, place the chair rod.
What is chair rod?
please refer the following image.
 |
| chair rod as cover block to maintain cover at top |
How can use chair rod?
Place the chair rod at nearer to support in order to resist the top negative rod from hanging. and It also used to maintain top cover.
 |
| chair rod as cover block to prevent hanging |
Okay Friends, Now we are at the end of this article. I hope now you understand that the purpose of cover block and how you can effectively use it?. cover block is small thing. but it serve the entire structure from severe damage.
Thank u sir
ReplyDeleteSuper I use these images to explain for student .my WhatsApp number +91 8124992986
ReplyDeleteReally great content keep posting
ReplyDeletevkreate
smo meaning
web develop
ping submission
local seo
Great post. I was once checking constantly this weblog and I'm impressed! Extremely useful information specially the closing part. I maintain such information much. I was once seeking this specific information for a very long time. Many thanks and best of luck.
ReplyDeletemodern small kitchen ideas
Attitude Badmashi Status Nawabi Badmashi Shayari in Hindi Quotes
ReplyDeleteVisit Here : Click Me
ReplyDeleteBest 888casino.com Casino Deals, Promo Codes & Reviews - Mapyro
ReplyDeleteCheck 서산 출장샵 out the 888casino.com Casino Review, Get Exclusive 888Casino.com Bonus Codes & 고양 출장샵 Free 정읍 출장안마 Spins for NJ & 경기도 출장안마 PA. 청주 출장안마
How to earn money online in 2022 || Claimsatoshi (review)
ReplyDeleteKgf chapter 2 all language live view count
Kgf chapter 2 all language live view count
Temporary pyar Song lyrics In English
Great Article Post. Thanks for sharing a information..
ReplyDeleteconcrete cover blocks manufacturers
concrete chequered tiles
concrete cover blocks
concrete cover blocks manufacturers in india
precast concrete blocks
PVC cover blocks
Paver Tiles Blocks
Concrete Chequered Tiles
20mm Round Footing PVC Cover Block
Paver Tiles Block
Upgrade your space with expert flooring Nampa. Trust our team for flooring that’s built to last and designed to impress.
ReplyDeleteGet the most value for your project with this competitive 500 micron HDPE sheet price from Singhal Global. Ideal for waterproofing and lining applications, these sheets combine durability with flexibility.
ReplyDeleteConnect with strangers through anonymous random video chat! This free anonymous video chat platform is a perfect Omegle alternative.
ReplyDeleteLock change
ReplyDeleteHypoluxo is a smart choice for enhancing home and office
security.
A weight loss clinic Miami provides expert guidance tailored to each patient’s health needs.
ReplyDeleteYour explanation of cover blocks was simple, accurate, and very helpful for beginners in construction. At LeakFoe, we use injection grouting waterproofing to protect reinforcement zones and eliminate seepage in structural members. Excellent tutorial!
ReplyDeleteGreat explanation of cover blocks — such a small component but vital for durability! Alongside reinforcement, moisture protection is also crucial. At Wet2Dry Solutions, many people search for waterproofing contractors near me to prevent seepage and ensure long-term structural strength. Very helpful article!
ReplyDelete