How to save sun shade for life long?
Sun shade is a important protection element in construction. It protect doors, window and inner side of building from hot sun light and rain water. If sun shade is not effectively placed and finished, several problem will occur. Major failure will arise if it is not perfectly placed and finished.
In this Article , we are going to discuss about how to place and finish a sun shade by step by step. I have given some images how to provide concrete and finish. Make comparison with one another. so you can understand.
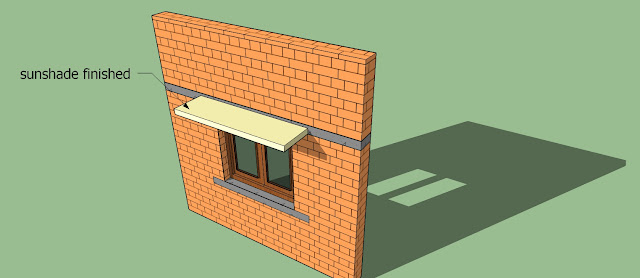
Take a close look at the following image and find what are errors are placed?
 |
| Example of sun shade placed and finished |
 |
| Example of sun shade finished in lower angle |
Any guess friends? What is wrong with the above images? Okay Friends, Later on in this article we will discuss the problems.
How to place a sunshade concrete in perfect way?
First of all, How to place a sun shade concrete in perfect way?
Reinforcement placing and leaving correct clear cover are important factors in sun shade. Take a look at the below image.
 |
| Example showing cover block and chair rod arrangements in sun shade |
 |
| Example of sun shade showing Reinforcement and cover block |
 |
| Example of sun shade main rod |
You can understand that how main rod effectively prepared and placed in a sunshade?. The development length of sun shade must be followed and inserted to lintel beam.without development length of a rod for sunshade may lead to failure.
So. strictly follow the above said cover block placing, chair rod and development length of bar.
okay, let us move to finishing part of sun shade.
How to finish a sunshade concrete in perfect way?
1st method to finish a sunshade:
A sunshade must be finished with water proofing Flat tile on top and projected for half inch around three sides. Ceiling of sunshade must have a water preventing border on its edges. At joint of the wall and sunshade the flat tile must be inserted to plastering to ensure the water not to enter.After inserting flat tile fill the remaining exposed masonry with mortar and can be finished.
 |
| sun shade having water border and flat tile |
Please close look at the below images.
 |
| Sun shade having flat tile on top |
 |
| sunshade having water border on its ceiling edge |
If do not provide border and flat tile projection sunshade , window and iron grill gets wet and severe damage will occur. Please reefer the below image .
 |
| sun shade not having water border allowing water |
I want to remind you at starting in this article that why this type of finishing the sun shade will fail.
2nd method to finish a sunshade:
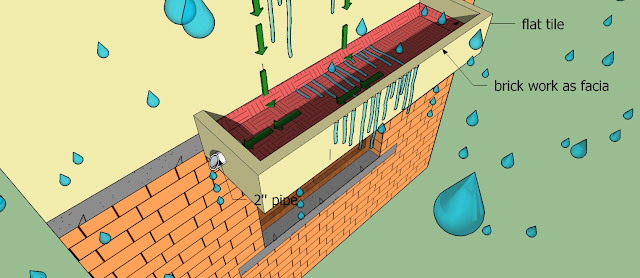
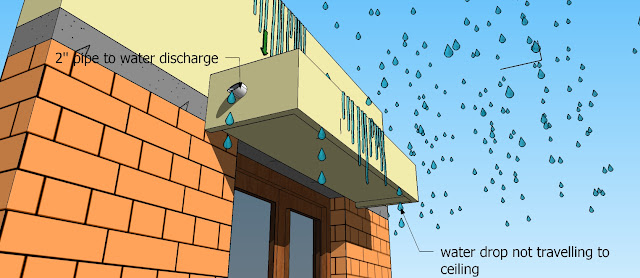
You can try the below method also. Especially in elevation work, you can do this for good looking.And in special condition water collected in sunshade is discharged in specific point.
 |
| sunshade having facia and pipe |
 |
| water discharged in pipe inserted in sun shade |
 |
| sunshade having facia and pipe |
conclusion:
During placing sun shade, provide cover block, chair rod development length.
During finishing, Provide water proofing flat tile and water border around its edges.
Thanks for this amazing article on How to save sun shade for life long? was Just searching for How Should We Build in the Coastal South - What Can We Learn From Florida? and found this amazing website of yours.
ReplyDeleteI just want to thank you for sharing your information and your site or blog this is simple but nice Information I’ve ever seen i like it i learn something today. Chicago Custom Home Builders
ReplyDeleteThank you very much
ReplyDeleteNice it seems to be good post... It will get readers engagement on the article since readers engagement plays an vital role in every blog.. i am expecting more updated posts from your hands.
ReplyDeletemodular kitchen manufacturers in maharashtra
Thanks for sharing this useful content. Online furniture, fixtures, and equipment schedules. ff&e schedule templates
ReplyDeleteThis is really a very good article. Thanks for taking the time to discuss with us, I feel happy about learning this topic. keep sharing your information regularly for my future reference.
ReplyDeletemodular kitchen designs photos
Thanks for sharing this valuable information. Make your bathroom a combination of contemporary aesthetics and unmatched durability. We Give You All the Options to Layout and Create the small bathroom remodel That You Desire. We Have Been Updating and Renovating Bathrooms for over many Years.
ReplyDeleteVonderhaus is a leading provider of high-performance fenestration systems. With an emphasis on sustainability
ReplyDeletefolding doors interior
Gutter Cleaning Baltimore, MD, provides essential maintenance services to keep your gutters in the best shape.
ReplyDeletegutter cleaning
What a fantastic blog! Your writing style is captivating, and your content is incredibly informative.
ReplyDelete#kitchenrenovation #kitchenremodel
"Great tips! Regular maintenance really makes a difference in extending the life of sunshades."
ReplyDeleteshrink wrapping machine delhi
Centrifugal Blowers manufacturers
"I didn't know cleaning the sunshade with mild soap could help so much. Thanks for sharing!"
ReplyDeleteManual Dust Collector Delhi
Rotary Air Locks in delhi
"Applying UV-resistant coating is such a smart idea! I’ll definitely try this."
ReplyDeletemacroni making machine manufacturer delhi
HDPE Sheet in Mumbai
"I always struggle with mold on my sunshade. Your cleaning tips are super helpful!"
ReplyDeleteStructural Steel Tubes in Indore
conditioner in delhi/dust
"I hadn’t considered storing the sunshade during winters. That’s a great way to avoid damage."
ReplyDeletecyclone type dust collector in bawal
Franchise show
"Do you recommend any particular brand of sunshade for long-lasting durability?"
ReplyDeletemobile compactor in noida
overhead conveyor manufacturer
"Anchoring the sunshade properly is key. A strong foundation prevents unnecessary wear."
ReplyDeletefile compactor storage system ahmedabad
mezzanine floor delhi
"Can you write a blog about how to repair small tears in a sunshade? That would be amazing."
ReplyDeleteAutomatic web Sealer
Fume Scrubber
"Regular inspections seem like a simple but effective habit. I’ll start doing this."
ReplyDeleteCentrifugal Blower in India
pallet storage warehouse in delhi
"Does the color of the sunshade affect its durability? Curious to know!"
ReplyDeleteAnise Oil Manufacturer Indonesia
pola making machine manufacturer
"Great information on avoiding harsh chemicals for cleaning. That’s where I was going wrong!"
ReplyDeleteArmour Board mumbai
Pre Galvanized distributors in Indore
"I always use a waterproof spray for extra protection. It works wonders!"
ReplyDeleteelectromagnetic vibro feeder in ghaziabad
dust extraction and collection in bawal
"Your blog is so helpful! Thanks for simplifying sunshade care for beginners like me
ReplyDeleteinvest in brands
office furniture in delhi
"Loved the tip about avoiding direct exposure during extreme weather. Makes so much sense."
ReplyDeletescrew bowl feeder
cantilever rack in jodhpur
"What about wind damage? Any advice on securing a sunshade in stormy weather?"
ReplyDeletemezzanine floor rudrapur
strech wrapping machine delhi
"The idea of using a sunshade cover for storage is brilliant. Thank you!"
ReplyDeleteManual Dust Collector
Pulse Jet Filter Bag in Delhi
"Can you recommend the best way to clean a sunshade without taking it down?"
ReplyDeletesoya badi making machine manufacturer
Drain Cell in Mumbai
"This blog is a lifesaver! I was planning to replace my sunshade, but now I’ll try these tips first."
ReplyDeletems tubes distributors in gwalior
dust conditioner in ludhiana
Kitchens Planet stands as a beacon of excellence in the world of kitchen solutions, specializing in premium Kitchen Appliances, Full Modular Kitchen, and Semi Modular Kitchen. Based in Gujarat, we are dedicated to transforming kitchens into functional, aesthetic, and innovative spaces that resonate with modern lifestyles.
ReplyDelete
ReplyDeleteYour post on maintaining sun shades for long-lasting durability was both practical and insightful. Sun shades are often overlooked, yet they play a crucial role in protecting structures from weathering and improving energy efficiency. I appreciated your tips on proper slope alignment, drainage planning, and regular upkeep—these small actions really do extend the life of outdoor features significantly. It’s great to see attention being given to both aesthetics and functionality in exterior design. For homeowners looking to improve or restore not just sun shades but their entire home exterior, R for Remodelers offers professional remodeling services that ensure both beauty and resilience in every project they take on.
Nice Blog
ReplyDeleteModular Kitchen Dealers In Gurgaon
For roofing and wall cladding jobs, we chose HDPE sheet for construction, and it’s held up beautifully. Definitely a value-for-money material.
ReplyDeleteRoofing services in delta
ReplyDeleteaffordable Stairways and Railings surrey
This comment has been removed by the author.
ReplyDelete