Damp proofing:
Damp rising could be stopped by damp proofing. because it may leads to severe
damage to the structure. First, paint finishing got bump and shedding .next,
cement plastering got corrosion and finally brick masonry got severely damaged.so we should apply all damp proofing methods in early stage of construction.
Example:
 |
| Effect of Damp Rising |
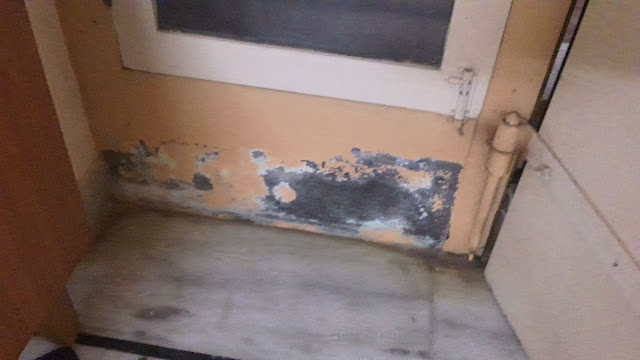 |
| Effect of Damp Rising |
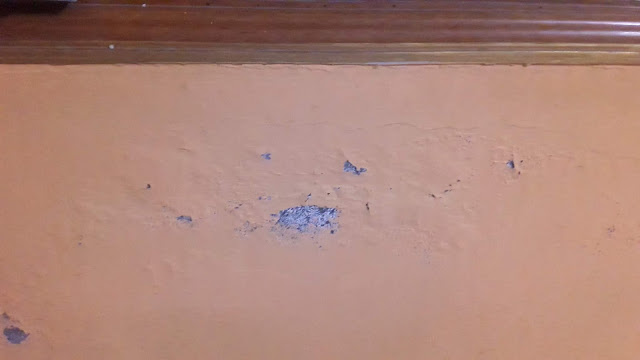 |
| Effect of Damp Rising |
 |
Effect of Damp Rising
|
Reasons:
- Bricks used may be a salt content one.
- not giving proper damp proofing chemicals
- Salt may be present in water and sand.
- Construction site may be nearer to water catching area like
bond, lake etc.
- Finally, Damp rising.
How to avoid it:
First four reasons can be avoided by selecting good quality
of raw materials, by applying damp proofing chemicals and selecting the proper construction site that could not
water catching area. Final reason the “DAMP RISING” could be avoided during the
execution of work by some construction techniques like DPC, BASEMENT PLASTERING
etc.
In this article, we will discuss about that how to avoid
DAMP RISING in earlier stages of construction period.
Example of Basement, That have not properly constructed against Damp Rising :
 |
| Inner and External Wall not Cement Plastered |
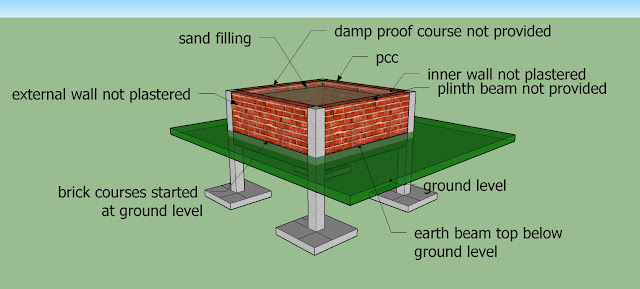 |
| Brick courses started at Ground level |
 |
| Plinth beam and DPC not provided |
If you watch the above 3 images, you can notice some points.
- Inner and outer brick wall are not covered by cement
plastering. So that ,in raining days, sand filling in basement gets wet and
exposed brick wall gets damp. Damp raised automatically by capillary action.
- Brick masonry courses started at ground level. Earth beam
top at within the natural ground level. I mean that bottom course touches the
natural ground. So that, brick wall gets wet. Damp raised by capillary action.
- Plinth level belt not provided, so damp rising within the
basement may extend up to superstructure.
- Damp proof courses like cement plastering, bituminous etc
not provided at the top of basement wall.
How to Prevent the Damp rising?
Please, go through the following pictures and study. You can
observe the ways.
Example of Basement that properly constructed against Damp Rising :
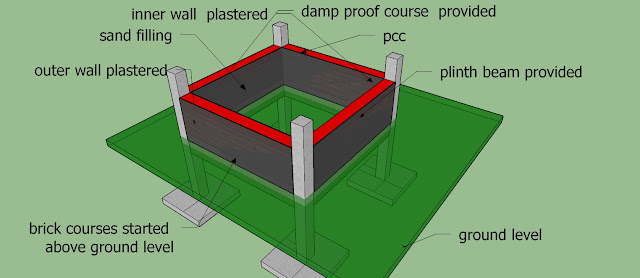 |
| View of Basement built against Damp Rising |
 |
| Earth beam prevent Damp Rising |
 |
| Earth beam prevent Damp Rising |
 |
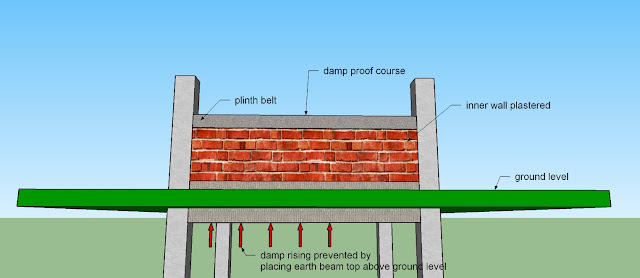
Earth beam top at above nature ground level so that
1st brick courses at above ground level and plinth beam provided
to stop the Damp rising continues to superstructure |
 |
view of all arrangement against Damp Rising at Earth beam Top,
Plinth Beam, Damp Proof Course at Basement level, Inner and External
wall cement plastering |
You can notice some important points:
- Earth beam top must be above the natural ground level .so,
Automatically Brick courses started above natural ground level. Even though the
surrounding area got wet, Damp raising arrested at bottom of the brick wall.
- Plinth belt must be provided in order to stop the damp
raising above basement. Damp raising by capillary action within the basement could
not continued.
- Cement plastering Could be a must one within the basement
for both internal and external .Even though, surrounding area gets wet, proper
cement plastering will arrest the damp will not permit the damp to go inside.
- Damp proof course must be provided at top of basement wall
in order to stop the damp raising. Damp raising by capillary action within the
basement could not continued to superstructure.
Conclusion:
There are huge amount of small holes within the bricks. So that Brick wall is affected. If you safe the Brick wall by above explained method
You can automatically arrest the Damp Raising.


Impressive!!
ReplyDeleteSAFEALL Best Wireless Doorbell Camera
Super sir.i really love u.
ReplyDelete+91 8124992986
Nice blog, thanks for sharing this. Here the given details about Rising Damp Clapham are totally genuine, am so impressed.
ReplyDeleteNice blog, thanks for sharing this. Damp Proofing is a technique used in construction to prevent moisture from entering a building's walls and floors. Moisture can cause a number of problems in a building. Including structural damage, mold growth, and respiratory problems.
ReplyDeleteDamp Proofing is a technique used in construction to prevent moisture from penetrating into buildings and causing damage. It involves applying various materials or treatments to surfaces such as walls, floors, and foundations to create a barrier against moisture ingress.
ReplyDeleteWhat Is a Plinth Beam and Why Is It Essential in Construction? – Get insights into the purpose of a plinth beam, its role in preventing differential settlement, and how it enhances the overall strength and stability of the structure.To read the full blog Click here Thank you
ReplyDeleteOur kitchen design service transforms your space into a functional, beautiful, and personalized heart of the home. We blend aesthetics with practicality, ensuring each kitchen we create meets your unique style and lifestyle needs. From sleek modern layouts to timeless traditional designs, we use high-quality materials, innovative storage solutions, and ergonomic layouts to maximize both space and functionality. Our expert team guides you through every step of the process—from concept and layout planning to material selection and final installation. With a focus on craftsmanship and attention to detail, we bring your dream kitchen to life, enhancing both its look and functionality. Explore our extensive range of kitchen fitter northampton by clicking this link to access our catalog, where you'll find detailed descriptions, pricing information, and customer reviews.
ReplyDeleteGreat blog! I appreciate the detailed information about HDPE sheets and their applications in various industries. HDPE sheets are widely used in damp proofing due to their excellent moisture resistance. As a product, they are durable, cost-effective, and highly versatile. For top-quality HDPE sheets, check out leading HDPE sheet manufacturers in Gujarat.
ReplyDeleteThanks for this post—Plastic HDPE Sheetss (typo noted, but good to address it!) are becoming a go-to for so many industries. I use them in my aquaponics setup, and they’ve outlasted other plastic materials by years. The flexibility, impact resistance, and non-toxicity make HDPE ideal for food-safe environments too. I’d recommend HDPE over PVC any day for projects needing strength and chemical resistance. It's great to see detailed blog content explaining the real-world benefits. If you could include more comparisons between HDPE and other common plastics, that would be incredibly useful.
ReplyDelete