Toilet installation and procedure for Arresting Leakage of Toilet
 |
| finished Toilet Installation |
Introduction:
Toilet leakage and its related problems can not be arrested as easily. More care should be taken in installing the Toilet and its related components. After occurring the leakage of Toilet, Arresting is almost impossible.Need to demolish the entire work and replace it with new one. So care should be taken in early stage of construction like providing sunken slab, Fixing pipe, fixing closet. In ground floor some basic skill is enough to install a Toilet. But in multistory building ( in first or second floor), more care needed.
In this article, I want to tell you about Installation of Toilet in first floor construction.
Here I want to explain that what are order of Installation of a Toilet with reference images. If we follow this order with care, almost we can stop the the leakage of Toilet.
Step 1:
Rising of column up to ground floor roof ( IE bottom of Sunken slab).Making of centring and shuttering work.
 |
| Rising of column to make Toilet installation |
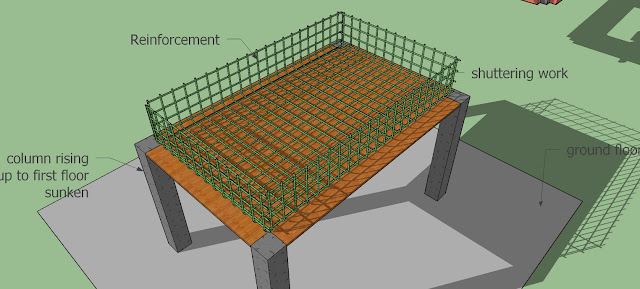
Laying of Reinforcement for bottom and side wall concrete.Place the cover block at random and maintain the effective clear cover at bottom and side also. Insert the side wall reinforcement in the column to arrest the leakage through the column.
 |
| Bar bending work for installation of toilet |
 |
| Bar bending work for installation of toilet |
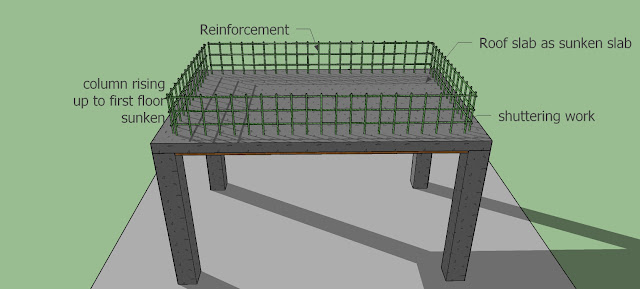
Providing Sunken slab concrete at bottom. Use admixtures like water proofing agent and maintain mixture ratio of 1:11/2:3 (M20 grade). sand should be clean as possible. Make sure that sand is screened through sieve and filtered from silt and unwanted minerals. Mixture of aggregate should be 50% 10 mm plus 50% 20 mm. So that, we can achieve proper mix. Then only we can make the concrete without honey comp voids.
 |
| providing roof slab for Toilet installation |
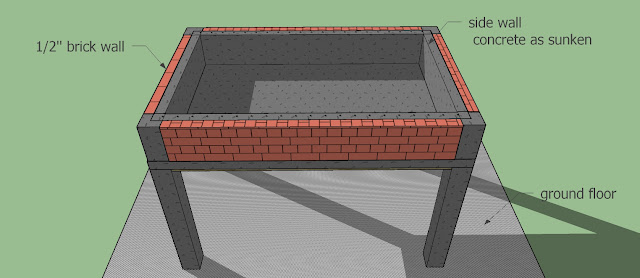
Providing half brick wall at outer edge as shuttering. cement mortar ratio must be 1:4. sand should be clean as possible. Make sure that sand is screened through sieve and filtered from silt and unwanted minerals.Curing of wall for atleast 7 days. after that we can proceed next work.
 |
| half brick wall at edge of slab to make toilet installation |
Providing Sunken slab concrete at side. all care must be followed as already said at bootom slab placing.Use admixtures like water proofing agent and maintain mixture ratio of 1:11/2:3 (M20 grade). sand should be clean as possible. Make sure that sand is screened through sieve and filtered from silt and unwanted minerals. Mixture of aggregate should be 50% 10 mm plus 50% 20 mm. So that, we can achieve proper mix. Then only we can make the concrete without honey comp voids.Place both side wall concrete and column concrete in same day without any joint.
 |
| side wall for sunken slab to make toilet installation |
Step 6:
Providing all the corners with taper arranment with brick masonry to form a curve or taper in order to arrest leakage at corner. You can refer the following image.
 |
| Corner tapering to arrest leakge at corner for proper Toilet installation |
Step 7:
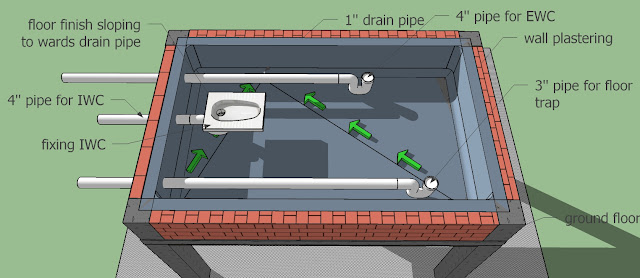
Provide holes for inserting the sanitary pipes for IWC, EWC and floor trap.Fix the required pipes properly. Arrest the holes with care and make sure that there is no leakage.Refer the following image. You can notice a small 1'' drain pipe . What is the purpose of this this this small pipe?. I will explain later in this article.
 |
| pipe fixing for proper toilet installation |
Step 8:
After fixing the pipe, make plastering for both side and bottom concrete wall simultaneously without any joint. use proper water proofing agents. The bottom floor finishing must have sloping toward the 1'' pipe. because, if any leakage from joints of pipe, joint from tile, the leaked waste will be disposed automatically through this drain pipe without damping the wall. This is purpose of the small drain pipe. This small pipe serves as the safe guard for the entire Toilet installation. It prevents the entire sunken slab from damage. you can understand by following the below image.The green colour arrow represent the sloping direction in order to conduct the leakage water.
 |
| green arrow represents the sloping direction |
Step 9:
After making wall plastering, Place Fix P trap and floor Trap and ensure the proper level of the pipe.Now close the outer end of all Pipe with seal and fill the water up to the top of P trap and floor trap and leave for 24 hours. After 24 hours, Check for any leakage. Watch the 1'' drain pipe for any flow.. If there is any leak and water flow from the drain pipe, replace the pipe work until leakage arrested. After getting confirmation, we can proceed the next work. If you don't take care in this level, the toilet system needs maintained for lifetime. So step 9 process is very important step.

Step 10:
After checking the leakage, First insert the IWC in to the p trap nd apply the mortar around the Joint.( Joint means P trap and IWC meeting point). Fill the remaining sunken slab with river sand up to the height of PCC. Consolidate the river sand with water and ram it.
 |
| Fixing IWC for Toilet installation |
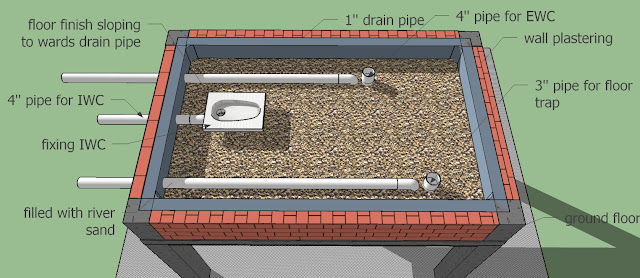 |
| River sand filled for Toilet installation |
Provide the PCC 1:4:8 for a minimum thickness of 5''. Better to use broken bricks for aggregate. because it will not damage to pipes. At he top of pcc, flooring with cm 1:3 with proper water proofing agent should be laid.
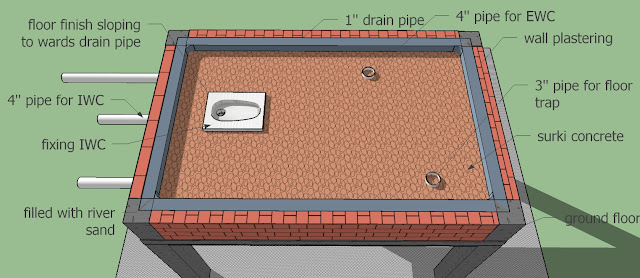 |
| providing pcc with water proof |
Laying of Ceramic or other floor finish properly should be made up to the top of IWC and sloping of tile finsh must towards the floor trap to convey the water.
 |
| Floor finish with tile |
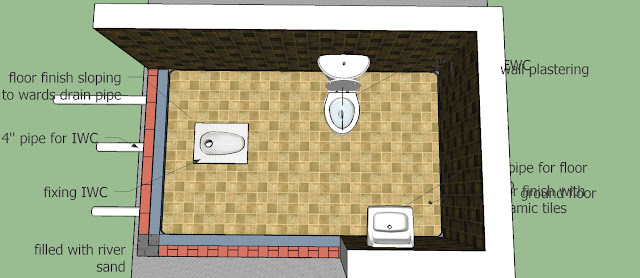 |
| finished toilet |
Conclusion:
- Follow the Proper concrete mix
- Use both 20 mm and 10 mm aggregate to get compact non void concrete.
- use screened river sand.
- use proper water proofing agent.
- water curing must be followed.
- Check all joints prior to fill the sunken.
Related Article: Brick wall, Damp proofing, All about window, All about parapet wall, All about cover block
very nice and simple sir. hats off to you for making the details so simple that even a child can understand.
ReplyDeleteAs one of the leading toilet installation and replacement services in Warrington, we are committed to offering 100% satisfaction to our clients with our excellent quality results.
ReplyDeleteWe offer beautiful floor stains Boise including premium hardwood floor stain Boise selections.
ReplyDelete