Staircase From marking to Finishing
Staircase is an important structural part in construction. It allows user to go further floors. Staircase must be constructed in proper way. Otherwise, User can not feel comfortable in using other further floors.
I mean that staircase have certain limitation. What are they?
- Each flight having Steps not more than 12 nos
- Riser should not more than 7'' and not less than 5''
- Tread must be not less than 9''.
- Height of the handrail must be exactly 2'6''.
- What ever may the number of flight and length of flight, but each flight must have a landing after 12 steps
- width of staircase must be at least 3'0'' for residence and 4'0'' for public.
Here I have given a example of finished staircase.
 |
| Staircase finished |
The above staircase satisfies the above said limits or rules.
- 1st flight having 12 steps.
- Height of the Riser is 7''
- Tread width is 11'' and 12'' including nosing.
- Height of the handrail is 2'6''.
- You can notice that there is landing after 12 steps.
- Width of the staircase is 3'0''.
How to achieve the correct and perfect staircase?
I have here explained step by step procedure from marking to finishing a staircase. You just follow them. Then you can make perfect staircase.
Planning a Staircase in Drawing:
Before starting a construction, You should plan in drawing that where a staircase should be located? How many Number of Riser and Tread?
Very important point What is the Roof height (Height from Ground floor finish level to First floor finish level). Number riser can be arrived by dividing the Roof height by Height of the Riser. Suppose If your Your Roof height is 10'6'' ( Ceiling 10'1'' + roof thickness 5'') and Riser height is 7''. Then You can get number steps are 18 ( 10'6''/7'' = 18 nos). You should adjust the ceiling height for Rounded number of riser ( No fractional number for steps number). suppose if you have roof height as 10'0'' and riser height as 7''. You will get ( 10'0''/7''= 17.14 nos). This value is a fractional. So you should adjust your roofing height to get round numbers. Got it?
 |
| Planning a staircase in floor plan |
Marking a staircase:
After reaching ground floor roof level before placing roof slab. Marking of staircase in concerned wall. In our case, we can take west wall for 1st flight and North wall for 2nd flight.We can understand how to mark the staircase by following the diagram. Mark the vertical lines for required Tread width interval( 11 inch) by using plump. Mark the horizontal lines for 7'' interval.
 |
| staircase tread,riser and landing marking |
After marking Vertical and horizontal lines, You can draw Tread and Riser from floor to roof.
 |
| staircase flight marking |
After Drawing the Steps, Connect all bottom joint by a sloping line. From that sloping line draw another parallel line for a flight slab thickness of 6''( 5'' for flight slab + 1'' extra provision for brick steps placing).
Centring, shuttering and bar bending for staircase:
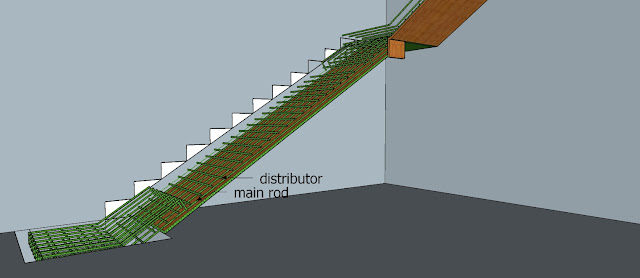
Make a proper centring work and place the reinforcement over it. Please follow the main rod curtailment and distributor as in the following diagram.Please note that scissor rod arrangement in each landing.
 |
| Reinforcement details in staircase |
 |
| Reinforcement details in staircase |
 |
| Reinforcement details in staircase |
 |
| Reinforcement details in staircase |
Placing waist slab:
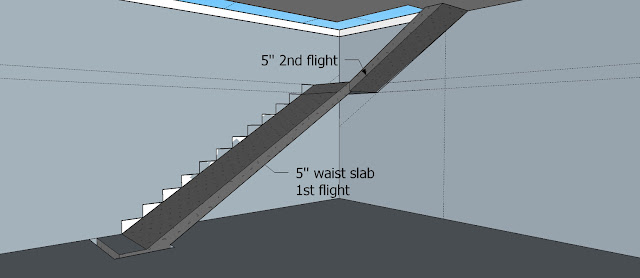
After the reinforcement work completion, Place m20 mix concrete. After 21 days proper curing stages after 21 days we can remove the shuttering work.
 |
| staircase waist slab placing |
Brick masonry for steps:
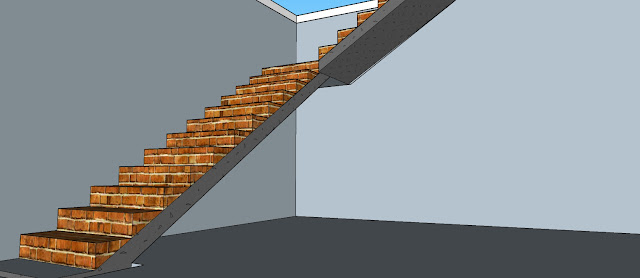
Now, we can build riser and tread with brick masonry in cm 1;5. Maintain Level and plump using tube level and plump pop respectively.
 |
| brick masonry for staircase |
 |
| brick masonry for staircase |
Finishing with Marble, granite etc:
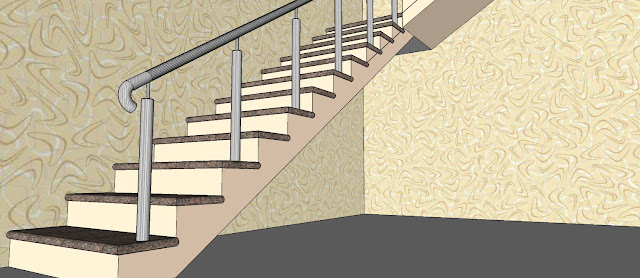
Use good quality of Granite or marble to finish. Giving nosing edge will provide good look.There are various designs of nosing. After finishing granite work, complete remaining ceiling plastering in cm 1;3.
 |
| staircase finishing with granite having full nosing |
Fixing Hand rail:
 |
| staircase with stainless steel handrail |
There are so many options available in market for Handrails like stainless handrail, Wrought iron, MS grill, wooden finishing. choose best one and apply it.
Okay, Friends. This is end of article. Hope all you understand the staircase.


Good information, everyone should follow this before installing the stainless steel handrails. Visit website
ReplyDeleteGood information, everyone should follow this before installing the stainless steel handrails. Visit website
ReplyDeleteVery nice info about construction of Staircase. Good luck.
ReplyDeleteThanks for sharing this useful content. Online furniture, fixtures, and equipment schedules. ff&e specification software
ReplyDeleteThank you for sharing this informative post. Concretx Construction LLC offers top-notch services as a Bricks Installation company near you .
ReplyDeleteGood This is very unique informative and beautiful article. I like it very much thanks
ReplyDeleteShed Base
Your writing style is engaging and easy to read.
ReplyDeletetarpaulins uk
Damp Proofing is a technique used in construction to prevent moisture from entering buildings and causing damage to structures and materials. It involves applying materials or coatings to walls, floors, and foundations to create a barrier against water penetration.
ReplyDeleteOur kitchen design services blend functionality with style, creating spaces that are both beautiful and practical. We work closely with clients to understand their unique needs and preferences, incorporating everything from layout optimization to custom cabinetry, lighting, and high-quality materials. Whether you're after a sleek modern kitchen, a cozy traditional space, or an innovative mix of both, we ensure every detail reflects your vision. Our designs emphasize efficient storage solutions, ergonomic layouts, and durable finishes that stand up to daily use. With expert craftsmanship and personalized touches, we transform kitchens into spaces where cooking, gathering, and entertaining are a true pleasure. If you're interested in learning more about kitchen design daventry, we invite you to visit this page where you'll find a wealth of resources, including articles, guides, and case studies.
ReplyDeleteWhat an inspiring blog! Thank you for your informative blog. It is amazing and wonderful to visit your site floor stairs services in vancouver
ReplyDeleteComfort and Safety First: It's crucial to ensure that each flight has no more than 12 steps to prevent exhaustion and reduce the risk of accidents. This ensures a more comfortable and safer experience for users. Learn more about
ReplyDeleteDust Cleaner
Pollution Control Equipments.
Proper Riser and Tread Dimensions: Maintaining a riser height of 5 to 7 inches ensures that the steps are not too steep or too shallow, making it easier to climb. Likewise, a tread of at least 9 inches offers adequate space for the foot, enhancing comfort. Check out
ReplyDeleteCentrifugal Blowers
Evaporative Aircooling System Manufacturer.
Handrail Height: The handrail height of 2'6" is ideal for providing proper support to users while ascending or descending the staircase, reducing the chances of falling. Explore
ReplyDeleteIndustrial Dust Cleaner India
Manual Dust Collector India.
Landings After 12 Steps: Installing a landing after every 12 steps is essential for safety. It provides a rest area, helping people who may get tired from climbing long flights of stairs. Learn more about
ReplyDeletePaint Booth India
Shrink Packing Machine Manufacturer.
Staircase Width for Accessibility: A width of 3 feet for residential buildings and 4 feet for public spaces ensures that the staircase is wide enough for safe use, especially in emergency situations like evacuations. Check out
ReplyDeleteShrink Wrapping Machine Manufacturer
Pulse Jet Bag Filter in Delhi.
Avoiding Overcrowding in Public Spaces: A 4'0" width for public spaces is particularly important for crowd control and ease of movement, especially during busy times or emergencies. It allows people to move quickly and comfortably. Learn more about
ReplyDeleteRotary Air Locks in India
Pulse Jet Bag Filter Manufacturer.
Consistency Across Flights: No matter the number of flights or the overall length, maintaining these standard dimensions across all flights ensures consistency and safety throughout the entire building, which is crucial for both residential and commercial spaces. Check out
ReplyDeleteRotary Air Locks in Manufacturer and Invest in Brands.
ReplyDeleteYour post on staircases—from marking to finishing—was incredibly informative and a great overview of the full process involved in creating one of a home’s most functional and aesthetic elements. I appreciated how you broke down each phase so clearly, from initial layout and structural considerations to the final finishing touches. It's easy to overlook just how much precision and planning go into something as seemingly simple as a staircase, but your post really highlights its importance in both design and safety. For homeowners looking to upgrade or add architectural beauty to their spaces, R for Remodelers is an excellent resource. Their craftsmanship and attention to detail ensure that every feature, including staircases, is built to last and impress.
One Of The Best Post.
ReplyDeleteGravel Grids
Cool
ReplyDeleteNice and excellent article sir...
ReplyDeletebungee cords
Roofing services in delta
ReplyDeleteaffordable Stairways and Railings surrey
Safety meets strength with Cell Com’s industrial handrails. As leading Industrial Handrail Manufacturers, we provide high-quality, corrosion-resistant handrails designed to comply with global safety norms. Our handrails are ideal for factories, warehouses, mezzanines, and walkways, offering both security and durability. Available in modular and custom-built formats, we ensure a perfect fit for any industrial setup.Enhance workplace safety with Cell Com's expertly crafted handrails. Reach out to us today and request a quote!
ReplyDelete“This was exactly the guide I needed. I appreciate you explaining the pros and cons of different cabinet materials so clearly.”
ReplyDeleteCabinet Design Under Staircase
After reading your blog, I must say it was very informative. For anyone looking for Staircase construction services in Powell OH, Wade Custom Carpentry LLC is truly exceptional. Their team handled my project beautifully, ensuring everything turned out better than expected. Highly recommended!
ReplyDelete